|
|
|
|
Page Views: 847 |
| Hashtags: #VisualBasic60 #ProgrammingforMicrosoftWindows |
| Chapter 2 of this free online course in Visual Basic 6.0. |
| Estimated reading time: 9 minute(s) (1906 words) |

As covered in the previous chapter, when you open Visual Basic, you are encouraged to either
create a new project, or open an existing one. The fact is, Visual Basic can
only work within the framework of a project.
In addition to the modules that make up your project, the project has other
properties: its name, its title (sometimes different from the name), its
copyright information, and more.
The project's name is the only property that must be supplied. It is
so essential, that new projects are given a default name when they are created:
"Project1". You will want to change this name.
Project names, and all other names in Visual Basic, follow the same rules for
Visual Basic identifiers.
Identifiers
All programming languages use identifiers, and the rules in VB are similar to
those in other languages. Visual Basic identifiers:
- Must begin with a letter
- May contain letters, digits, and underscores
- Are limited to 255 characters in length
Setting the Project Properties
The project's properties are set via a dialog box that is activated by
choosing the Project..Properties menu command. Now, this command's
caption is altered dynamically according to the current name of the project. So,
if you've been following these instructions, that command will read, "Project1
Properties…".
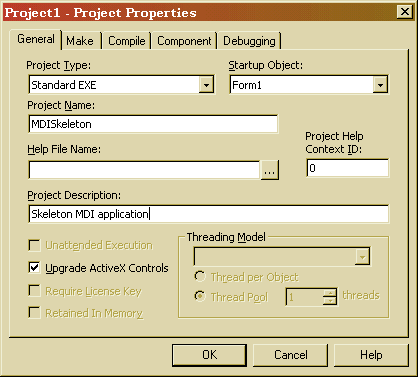
You specify the name of your project on the "General" tab of the Project Properties
dialog, in the "Project Name" text box, of course.
Remember, the project name must be a valid Visual Basic identifier—no spaces
allowed!
It is also a good idea to provide a project description. Future versions of
Windows may use the project description to help users decide which applications
to run. If you use Visual Basic to build an ActiveX project, the description is
used now, in the lists of available ActiveX components.
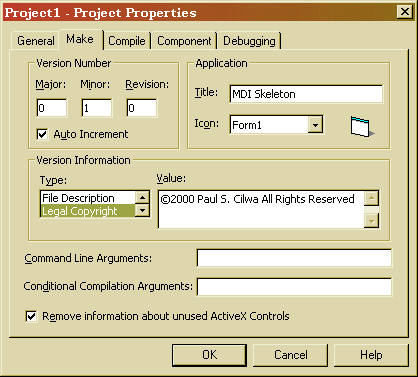
On the "Make" tab of the Project Properties dialog, you can specify the version number
of the project, as well as other identifying information, such as the
application's "title" and copyright notice.
The title is easy to get to; but
access to much of the other information is a little more subtle. The
version information is arranged by type, accessed by the little
listbox at the middle left of the form. Whichever item you select,
its value appears (and can be updated) in the Value text box in the
middle right.
Usually, you will find the Company value filled in
for you; the value originally comes from you, when you
install Windows.
Legal Copyright
Let's look at the Legal Copyright value, since filling it in can be
interesting.
Copyrights are generally of the form, "(c) year name All Rights
Reserved". The phrase "All Rights Reserved" (or a statement of the
rights which are reserved) is required; without it you state
your ownership of the work but give away your rights to it!
The copyright symbol, originally defined to be a "c" with a circle
around it, was expanded at the beginning of the 1900s to accommodate
typewriters, which did not include such a key. The replacement
symbol, "(c)", used characters the typewriter did possess.
(The word, "copyright", spelled out, is also allowed.) However,
pretending the computer has the limitations of a typewriter is
tacky. Most of the fonts available for computer include the official
copyright symbol, so we might as well use it.
There are two ways
to get the copyright symbol into the Legal Copyright field: the
easy way and the geeky way. We'll look at the easy way, first.
A program that comes with all versions of Windows is Character Map.
This program is only installed if you ask for it; but it is
definitely worth having. The different versions of Windows have
different versions of Character Map, but all versions work
essentially the same. The Windows 98 version is shown below.
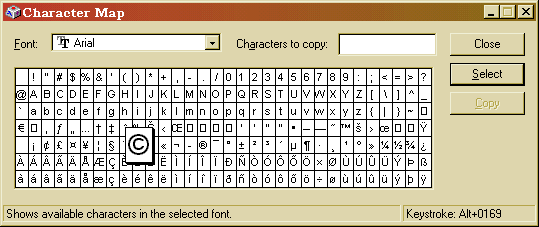
The very first time you run Character Map, the pre-selected font
will be Symbol. You don't want to use this one, as it is
doesn't use the standard ASCII/ANSI codes. Arial makes a better
choice. Locate the copyright symbol and select it, click the Select
button, and then the Copy button.
Returning to the Project
Properties dialog, click where you want to put the copyright symbol,
and press Ctrl+V (for paste). The copyright symbol "?" will appear
for you.
The geeky way is simpler, as long as you are using a full-sized keyboard with
the Num Lock key toggled on. What's geeky about it, is that you are
required to have memorized the ANSI code of the copyright
symbol (169). After clicking where you want to place the character,
hold the Alt key down and, at the numeric keypad, key zero and
then the code: Alt+0169. The character will appear.
Project Explorer
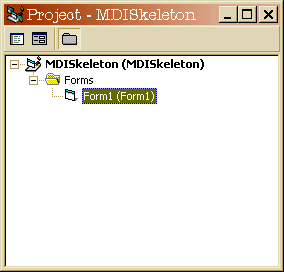
You get to explore your application project via the Project Explorer. This
window, which you can open from the View menu if you close it, shows you
all the modules you've made part of your project. You can see them separated by
type, or all together, by toggling the Folders button (rightmost on the Project
Explorer toolbar).
What parts of your project can you "explore"? Well, your
project will be composed of files called modules, in several
different types ranging from forms to user controls. These modules
can be added to your project by choosing one of the Project..Add
commands. Or, you can add an existing module to your project in one
of several ways:
- Drag the file you'd like to incorporate into your project, from Windows
Explorer or a folder window, right onto the Project Explorer
- Choose the Project..Add File command
- Right-click on the Project Explorer and choose Add..Add File from
the context menu
Most module operations can be listed by right-clicking on the module in which
you are interested. For example, you can remove the Form1 module by
right-clicking on it and selecting Remove Form1 from the menu.
You can also open a form for code editing, or designing, by clicking on it.
We'll try that in just a bit.
Storing Your Project to Disk
Generally, you will find it most convenient to have your project stored in a
single folder on your hard drive. Some people like to reference a few modules in
shared network folders, but such components are better packaged as an ActiveX
library so you don't have to worry about multiple accessors changing them.
My recommendation is that you create a Projects folder, somewhere, and
store each project in a subfolder beneath that. If you are working on a large
project as part of a team, the Projects folder can be on a shared network
drive. As long as each module is modified by a single programmer, there will be
no conflicts. (Changed modules will even be automatically re-loaded!)
Each module—every form, class module, and so on—will be stored as a
separate disk file. When you save your project, the modules will be
saved first, then the project file itself will be saved. You'll get
a separate File Save As dialog for each module, and one for the
project.
When the first one appears, it is vitally important that
you position it to the folder in which you want to save your
project. The subsequent dialogs will already be pointing to that
folder.
Project References
One of the strengths of Visual Basic is that…it isn't limited to the
strengths of Visual Basic! There are many ActiveX libraries out there, not all
written by Microsoft, that you can take advantage of to get your application
going.
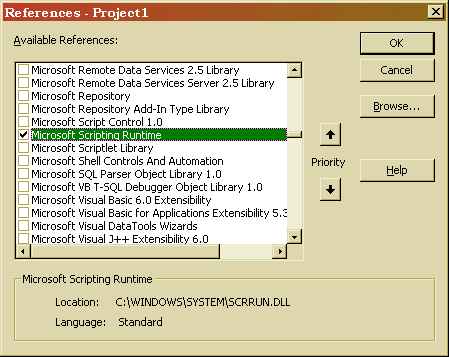
While some of these are ActiveX controls (which we'll look at next chapter), many of them
are non-visible objects just waiting to enhance your project.
For example, suppose you want to programmatically control Microsoft Excel.
You would need the Microsoft Excel 8.0 library; adding this library to your
project would give you access to the various Excel objects—like workbooks,
worksheets, and cells—you need.
To see which libraries you're already using, to discontinue using one or to
add one, use the Project..References command. It brings up (after a
pause) a dialog box containing a list of every library registered on your
system. You can also "browse" for a library file and register it, via this
dialog.
Browsing Your References
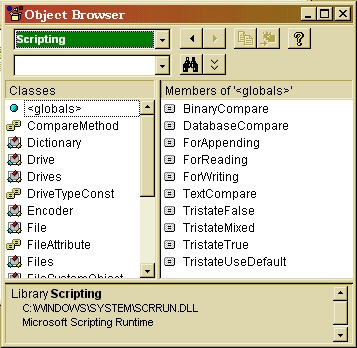
So, now you've got access to the Microsoft Scripting Runtime library. How can you find
out what do do with it? Easy! Just press the F2 button, or use the
View..Object Browser command to open up the Object Browser and examine the
properties, events and methods of any of your library references.
When the Object Browser first opens, the upper left combo box reads, "<All
libraries>", which usually provides too much information to be
useful. However, you can drop down the list and select any specific
library you wish. Immediately, its classes appear in the listbox to
the left; the member of any class you select will appear on the
right. Anything you select also causes a terse description to appear
at the bottom of the window; and, if you press the F1 key,
you will be treated to a full Help Engine treatise on the subject!