|
By: Paul S Cilwa |
Posted: 4/24/2026 |
|
Page Views: 42 |
| Hashtags: #Software #Images #Conversion #Photography #Tools #Tutorial |
| A detailed walkthrough of every panel and control in Aspecta's interface. |
| Estimated reading time: 6 minute(s) (1292 words) |
Loading an Image
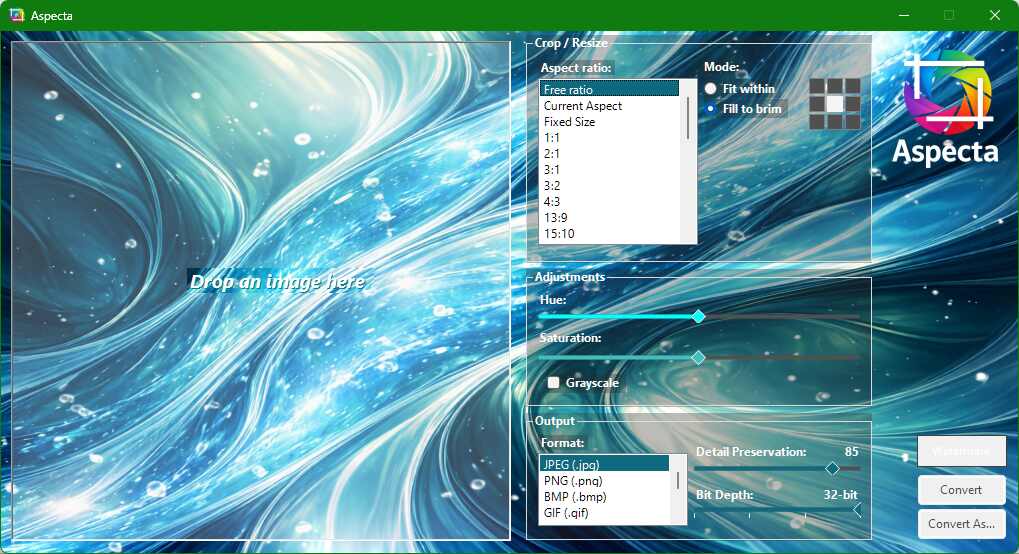
The center of the window is a drop zone. Drag any supported image
file from File Explorer and drop it there. Aspecta will load the
image and display a live preview immediately. The preview resizes
dynamically to match whatever output aspect ratio you've
selected, so you always see exactly what the final result will
look like.
You can also double-click the drop zone to open a
standard file dialog. Same result, different gesture—whatever
feels more natural to you.
Clipboard Paste
If you have an image on the clipboard—say, a screenshot
you just took with the Snipping Tool—press Ctrl+V
and Aspecta will load it directly. No need to save it to a
file first. This is handy when you want to quickly crop or
convert a screenshot without cluttering your desktop with
temporary files.
You may also right-click the drop zone to access a context
menu with additional options.
Multi-File Batch Processing
Aspecta handles multiple files at once. You can drag several
image files onto the drop zone, or drop them on a desktop
shortcut to Aspecta, and they will all be processed in one
go.
If you have previously configured and saved your conversion
settings (format, quality, aspect ratio, and so on), Aspecta
batch-converts all the files silently using those settings.
No window appears—the files are just converted and saved.
If no saved settings exist yet, Aspecta will prompt you to
configure them first, then process the batch.
This makes it easy to set up a workflow: configure your
preferred settings once through the GUI, then just keep
dropping files on the shortcut whenever you need them
converted.
Crop and Resize
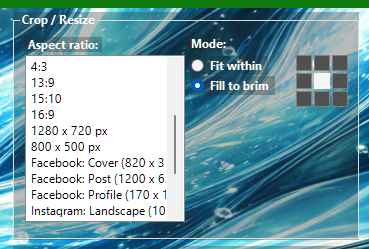
The left panel contains the aspect ratio list. This includes
standard ratios (16:9, 4:3, 1:1, 3:2, and others), fixed pixel
sizes (1920x1080, 1280x720, etc.), and social media presets
for platforms like Instagram, Facebook, YouTube, and X/Twitter.
Sizes larger than the source image are automatically filtered
out of the list, so you won't accidentally upscale.
Fit Mode
When you select Fit Within, Aspecta resizes your image so that
it fits entirely within the target dimensions. No pixels are
lost—the entire image is preserved. The result may be
smaller than the target size if the aspect ratios don't match
exactly. Think of it like fitting a painting into a frame
without cutting anything off.
Fill Mode
When you select Fill To Brim, Aspecta resizes your image so that
it completely covers the target dimensions, then crops the
excess. This guarantees the output is exactly the target size,
but some of the image will be trimmed. The orientation grid
(described below) lets you control which part of the image
is kept.
The Orientation Grid
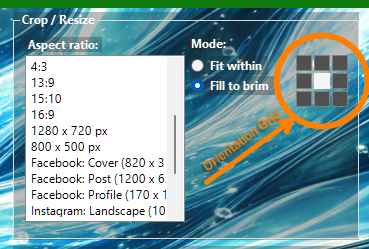
The orientation grid is a 3x3 set of cells that only becomes
active in Fill mode. It controls which part of the image is
kept when cropping. Click the center cell to keep the middle
of the image. Click the top-left cell to anchor the crop to
the top-left corner, and so on. This is much more intuitive
than dragging crop handles—you just tell Aspecta which
region matters most and it handles the math.
Adjustments
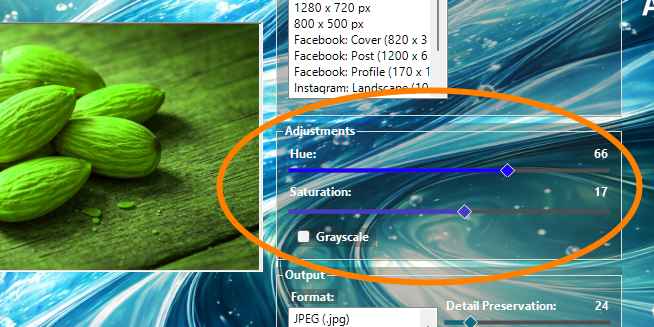
The adjustments panel provides three controls:
- Hue slider—shifts all colors in the image
around the color wheel. A small shift can warm up or cool
down a photo; a large shift produces dramatic color
transformations.
- Saturation slider—controls how vivid the
colors are. Slide it up for more punch, down for a muted
look.
- Grayscale checkbox—when checked, this
automatically sets the saturation to zero and saves your
previous saturation value. Uncheck it and the previous
value is restored, so you can toggle back and forth
without losing your setting. It will also cause your
image to be saved in a grayscale format if the output supports it.
Output
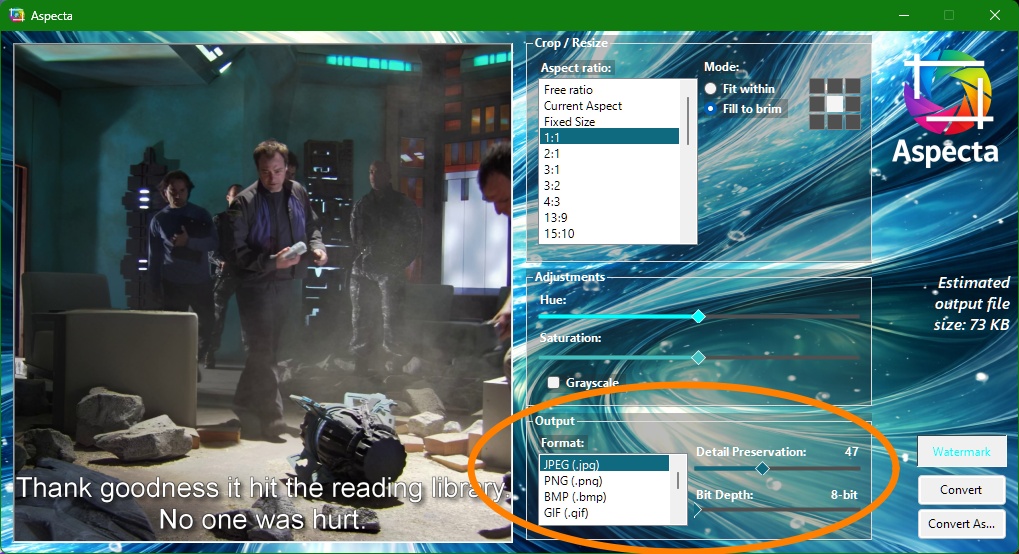
The output panel lets you choose the target format from a
dropdown list. For lossy formats like JPEG and WebP, the
Detail Preservation slider controls the compression
level. Lower values mean smaller files but more visible
artifacts.
Below the Detail Preservation slider, the estimated file
size updates in real time as you adjust settings. This
estimate is accurate because Aspecta actually encodes the
image in memory to calculate it—it's not a rough guess.
You can dial in exactly the tradeoff between quality and file
size you want before saving.
The bit depth slider lets you reduce the color depth of
your output image. Its maximum is automatically set from
the source image—you can reduce depth but never
increase it, because you can't add color information that
wasn't captured in the original.
Saving
Two buttons handle saving:
- Convert—saves the output to the same folder
as the original file, using the original filename with
the new format's extension. Quick and simple.
- Convert As—opens a standard save dialog so
you can choose a different location or filename.
In both cases, the original file is never modified. Aspecta
always creates a new file.
When you're working with a pasted clipboard image, the buttons
switch to Save and Save As instead, since
there's no original file to "convert" alongside.
Settings Persistence
Aspecta remembers your conversion settings between sessions.
Whenever you convert an image, your current choices—format,
aspect ratio, quality, crop mode, and color adjustments—are
saved to the Windows Registry. The next time you launch Aspecta,
those settings are automatically restored so you can pick up
right where you left off.
This is what makes batch processing so smooth. Configure your
settings once, and every subsequent file you drop on Aspecta
gets the same treatment without any extra clicks. If you ever
want to clear your saved settings and start fresh, pass
-Reset on the command line.
Watermarks
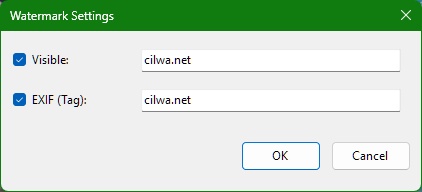
Aspecta allows you to add watermarks to your images during conversion.
A visible watermark appears in the bottom-right corner of the image.
An EXIF watermark is embedded in the image's metadata and isn't visible
when viewing the image, but can be read by software that supports EXIF data.
(Note that this kind of watermark can be easily removed by anyone who knows
how to edit EXIF data, so it's not a secure way to protect your images.
It's more of a "soft" watermark for attribution rather than a "hard"
watermark for copyright enforcement.)
You can enable either or both types of watermarks in the settings panel.